EDI Tools for .NET uses C# classes to represent the layout of EDI transactions. These classes are nothing more than standard C# .NET classes with some extra markup and are referred to as EDI templates.
The purpose of the EDI templates is to provide a machine-readable and developer-friendly specification of EDI transactions that closely match their implementation guidelines.
So, EDI template = .NET classes + extra annotations. To learn more about EDI templates head on to our Standardize with EDI templates article.
All EDI templates are provided in their purest form, as a collection of C# classes and files, which developers can then use to combine, build and integrate into their own solutions.
Most EDI templates for the trial and examples are provided as pre-built assemblies (NuGet packages) apart from the example templates, however, in the paid version they are all provided as C# files.
Why modify an EDI template
Sometimes you need to modify your existing EDI template(s) for reasons such as:
- To match an external specification
- A trading partner uses custom EDI code sets
- A trading partner uses extra fields in one or more segments
- A trading partner requires optional data elements to be mandatory, or vice versa
- A trading partner uses segments and loops in different positions
- A developer wants to add extra properties to the EDI template, not relevant to EDI
It is perfectly fine to go ahead and do any of these changes. EDI templates are meant to be living documents that can easily be modified when the guidelines change.
The rule of thumb is to maintain the baseline version of the template in one project and to move all partner-specific customization into separate projects. This way the baseline version is shielded from any changes and all new modifications are safely isolated into their own containers.
There are two ways to modify a template:
- By deriving from the C# class of the template, and then modify the derived class
- By creating a copy of the template, and then modify the copy
Modify by deriving from a C# class
Let's assume that a trading partner (Partner A) wants to send you custom purchase orders, based on a standard EDI version, like X12 4010. The concepts in this example are valid for all EDI standards.
The full example is available in GitHub:
Let's also assume that all the differences are in the BEG segment only and are specified as:
- The data element at position 4 is changed from Optional to Mandatory
- The data element at position 12 is subject to a new code set with only two values - NEWCODE1 and NEWCODE2
- An extra data element of type alphanumeric is added just after the last data element at position 12
This is how the standard EDI template for X12 4010 850 (purchase order) looks like. The specification of the BEG segment is (omitting the elements that don't change):
[Segment("BEG")]
public class BEG
{
    ... other elements

    [StringLength(1, 30)]
    [DataElement("328", typeof(X12_AN))]
    [Pos(4)]
    public string ReleaseNumber_04 { get; set; }

    ... other elements

    [DataElement("640", typeof(X12_ID_640))]
    [Pos(12)]
    public string TransactionTypeCode_12 { get; set; }
}
The exact definition of the BEG segment is here (search for BEG).
The code set for the data element at position 12 is defined as:
[EdiCodes(@",01,02,03,04,05,06,07,08,09,10,11,13,14,15,16,17,18,19,20,21,22,23,24,25,26,27,28,29,30,33,34,35,36,37,38,39,3M,40,41,60,62,63,64,65,66,67,68,69,6A,6C,6N,6R,6S,70,71,72,73,74,75,76,77,78,79,80,81,82,83,85,87,88,91,94,95,97,98,99,A0,A1,A3,A4,A5,A6,A7,AA,AB,AC,AD,AE,AF,AG,AI,AM,AN,AP,AQ,AR,AS,AT,AV,AW,AZ,BA,BB,BD,BF,BH,BJ,BK,BL,BM,BN,BO,BP,BR,BS,BT,BU,BV,BW,C0,C1,C2,C3,CA,CB,CC,CD,CE,CF,CG,CH,CI,CJ,CK,CL,CM,CN,CO,CP,CR,CS,CT,CU,CV,CW,CX,CY,CZ,D1,D4,DA,DB,DC,DD,DE,DF,DG,DH,DI,DK,DL,DN,DO,DP,DQ,DR,DS,DT,DU,EA,EB,EF,EI,EM,EP,ER,EX,FA,FB,FC,FD,FE,FF,FG,FI,FL,FM,FN,FP,FR,FS,FT,GA,GI,GR,HP,I1,IA,IB,IC,ID,IE,IF,II,IM,IN,IO,IR,IU,IW,IX,IZ,JM,JO,JR,JS,JU,JX,KB,KC,KD,KE,KF,KG,KH,KI,KJ,KK,KL,KM,KN,KS,KT,LC,LD,LE,LF,LN,LO,LP,LR,LV,M1,MA,MB,MC,MD,ME,MF,MI,ML,MM,MP,MR,MS,MU,N1,N2,N3,N4,N5,N6,N7,N8,NA,NB,NC,ND,NE,NF,NG,NH,NI,NJ,NK,NL,NM,NO,NP,NQ,NR,NT,NU,OC,OF,OP,OR,P1,PA,PB,PC,PD,PE,PF,PG,PI,PL,PM,PO,PP,PR,PS,PT,PU,PV,PW,PX,PZ,QA,QB,QC,QD,QE,QF,QG,QH,QJ,QK,QL,QP,QR,R1,R2,R3,R4,R5,R6,R7,R8,RA,RB,RC,RD,RE,RF,RG,RH,RK,RM,RP,RQ,RS,RT,RU,RZ,S1,S2,S3,S4,SA,SB,SC,SD,SE,SF,SG,SH,SL,SM,SO,SP,SQ,SR,SS,ST,SU,SV,TD,TG,TH,TI,TJ,TK,TP,TR,TS,TT,TX,U1,U2,U4,U5,U9,UA,UC,UD,UF,UI,UM,UO,UP,UR,UT,V1,VH,VJ,VL,VM,VN,VO,VP,VQ,VR,W1,W4,W5,WA,WC,WD,WH,WO,WS,WT,X1,XA,XB,XC,XD,XX,XY,XZ,YI,YR,ZA,ZB,ZC,ZD,ZE,ZF,ZG,ZH,ZI,ZJ,ZK,ZL,ZM,ZN,ZO,ZP,ZQ,ZR,ZS,ZT,ZU,ZW,ZZ,")]
public class X12_ID_640
{
}
The following steps can be taken to create a new EDI template that matches the differences in the BEG segment listed above:
- Create a new C# class that derives from the BEG segment class.
- Add the [Required] attribute to the ReleaseNumber_04 element, to mark it as mandatory.
- Create a new class, X12_ID_640_Modified, for the EDI codes and add it as the type for TransactionTypeCode_12 element in [DataElement] attribute. Add NEWCODE1 and NEWCODE2 as the only code values in the new class.
- Create a new element, ExtraElement_13, and add the [Pos(13)] attribute to it, to mark it at the last position.
The final modified BEG segment should look like this (the changes to the original template are bolded):
[Segment("BEG")]
public class BEGModified : BEG
{
    [Required]
    [StringLength(1, 30)]
    [DataElement("328", typeof(X12_AN))]
    [Pos(4)]
    public new string ReleaseNumber_04 { get; set; }

    [DataElement("640", typeof(X12_ID_640_Modified))]
    [Pos(12)]
    public new string TransactionTypeCode_12 { get; set; }

    [DataElement("Extra", typeof(X12_AN))]
    [Pos(13)]
    public string ExtraElement_13 { get; set; }
}
The new code set class X12_ID_640_Modified is defined as:
[EdiCodes(@",NEWCODE1,NEWCODE2,")]
public class X12_ID_640_Modified
{
}
All data elements in the derived class must hide the inherited members by using the new keyword.
The final step is to create a derived class for the purchase order template, and use the derived BEGModified class in it (the changes to the original template are bolded):
[Message("X12", "004010", "850")]
public class TS850Modified : TS850
{
    [Required]
    [Pos(2)]
    public new BEGModified BEG { get; set; }
}
That's it. The new template derives from the original and ideally is in a separate file, so when the original template changes (e.g., for a bug fix), the derived will remain unaffected.
Additional examples in GitHub:
- Modify X12 templates
- Modify EDIFACT templates
- Modify HL7 templates
- Modify NCPDP Telco templates
- Modify NCPDP SCRIPTtemplates
How to use the modified template
To use any template, regardless of whether it is original or modified do:
- When generating an EDI file - instantiate the type you want to work with.
- When parsing an EDI file - pass in either the assembly or the type that you want.
A good practice is to split the original template and the derived template into separate projects and to also rename the namespace so that your calling application can have references to both projects at the same time. Then load either the original or the modified assembly, either by knowing where the file has come from:
var x12Templates = "MyOriginalTemplatesForX124010";
if(EDI file is from Partner A)
    x12Templates = "MyModifiedTemplatesForX124010";

using (var ediReader = new X12Reader(File.OpenRead("EDI file"), x12Templates))
or by using the sender/receiver values from the envelope
using (var ediReader = new X12Reader(ediStream, AssemblyFactory))

public static Assembly AssemblyFactory(MessageContext messageContext)
{
    if (messageContext.SenderId == "PARTNERA")
        return Assembly.Load("MyModifiedTemplatesForX124010");

    return Assembly.Load("MyOriginalTemplatesForX124010");
}
You can have both the original template AND the modified in the same project/assembly. In this case, use type factory instead of assembly, because assembly matching uses the MessageAttribute, which only works when a single type in the assembly has the same values for standard, version, and transaction ID.
using (var ediReader = new X12Reader(ediStream, TypeFactory))

public static TypeInfo TypeFactory(ISA isa, GS gs, ST st)
{
    if (isa.InterchangeSenderID_6 == "PARTNERA")
        return typeof(TS850Modified).GetTypeInfo();

    return typeof(TS850).GetTypeInfo();
}
Additional examples in GitHub:
- Resolve X12 templates
- Resolve EDIFACT templates
- Resolve HL7 templates
- Resolve NCPDP Telco templates
- Resolve NCPDP SCRIPT templates
Modify by creating a new copy
Let's go back to the example above but instead of creating a derived class to modify, we copy all the template files into a new project.
Keep the original X12 templates in one project.
Original project:
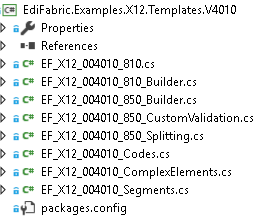
A good design is to also move the segment and complex interface files into a separate project and add a reference to it.
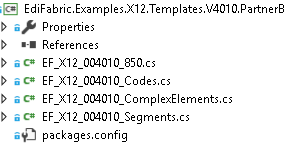
Create a separate project, for the modified templates, let's call it Partner B. Then copy the following files into it:
- The message file for 850,
- The segments file
- The EDI codes file
- The complex elements file
- The interfaces files for segments and complex elements (given they are not in a separate project)
Modified project for Partner B:
Ensure to add a reference to the interfaces project, if any.
Apply any modifications directly in the BEG segment, in the modified project.

Rename the namespace to be able to use both the original project and the modified project as references to the same calling application.
Use the modified template
Load the modified template in the modified project in exactly the same way as explained in the How to use the modified template paragraph above.
var x12Templates = "EdiFabric.Examples.X12.Templates.V4010";
if(EDI file is from Partner B)
    x12Templates = "EdiFabric.Examples.X12.Templates.V4010.PartnerB";

using (var ediReader = new X12Reader(File.OpenRead("EDI file"), x12Templates))
How to add non-EDI properties
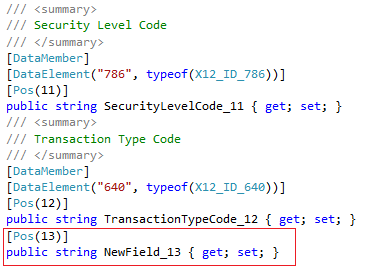
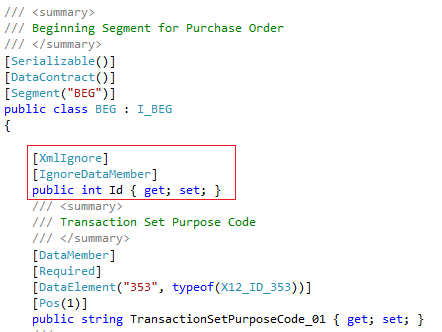
Sometimes you need to add custom properties that are irrelevant to both the parser and EDI in general. This is handy when the template is used not only for EDI but for other purposes as well.
All you need to do is simply add the property. EDI Tools for .NET is only interested in the properties annotated with the template attributes and all properties that are not annotated with the template attributes will be discarded.
To add a new int member Id, simply insert it in the class definition, and do not annotate it with template attributes, not even the [Pos] attribute. Should you use JSON or XML serialization you will have to add all serialization properties too.
Rules for deriving from EDI template
All EDI templates support inheritance. This allows you to define custom templates that reuse, extend, or modify the structure of the original templates.
EDI template inheritance can be applied to any C# class by following these rules:
-
Derived classes must retain all template attributes. For example, if you want to inherit from

The new class must still define the original attributes:

-
Hidden or overridden properties must retain all template attributes. For example, if want to add an extra validation attribute to ReleaseNumber_04 property and make it mandatory

The new class must retain the original attributes:

-
To not duplicate positions. The parser will throw an exception if there are any properties marked with [Pos] attribute for the same position.
Comments
0 comments
Please sign in to leave a comment.